오늘은 필자의 취미 생활 중 하나인 Android Library 개발의 배포 방법에 대해서 정리하려고 한다.
사실 맨 처음 Library 개발하는 것부터 시작하면 너무 양이 많기도 하고, Library 개발하는 방법에 대해서는 이미 좋은 레퍼런스가 많이 있으니 다음에 기회가 되면 정리할 예정이다.
그래서 오늘은 Android Library를 배포하는 방법에 대해서 정리하려고 한다.
Andorid에서는 jCenter라는 곳과 MavenCentral이라는 두 저장소를 주로 사용했으나 jCenter를 운영하는 JFrog 회사가 공식적으로 jCenter 서비스 종료를 선언했다. 그래서 곧 공식적으로 제공되는 곳은 MavenCentral 저장소 하나로 지정되었다. (사실 배포 과정은 jCenter가 상당히 간편해서 좋았다.)
Maven Central로 배포하기 위한 선택적 준비물이 있는데, 본인 명의의 도메인이다. 만약 본인 명의의 도메인이 없다면, github.io를 통해서 배포할 수 있다. 다만 github.io를 사용하게되면 io.github.~ 이런 형식의 Group ID를 갖게 된다. 필자는 가비아라는 도메인 호스팅 업체를 이용해서 사용 중인데, 도메인 이름의 희귀성과 .com, .co.kr 등 종류에 따라서 가격이 몇 천원부터 몇 십만원까지 달라지므로 본인 상황에 따라서 알아서 구매하면 좋을 것 같다.
먼저 배포할 라이브러리가 준비되어 있다는 가정하에 다음과 같은 과정이 필요하다.
- Sonatype JIRA 계정 생성 및 티켓 생성
- Sonatype에서 운영하는 Maven Repository에 본인의 라이브러리를 배포하기 위한 저장소를 만들어달라고 요청하는 티켓을 생성하는 작업.
- 본인 명의의 도메인 인증 후 Sonatype JIRA 티켓 Resolved 확인
- GPG key 생성
- 배포할 라이브러리에 배포 관련 Script 작성 및 배포 w/ GPG key
- Library 버전, 이름, 설명 등등 포함시키고 Sources와 Javadocs를 같이 Artifacting할 수 있도록 Gradle 설정 및 Task 추가하는 작업.
- Nexus Repository Manager에 들어가서 배포된 Library 확인 및 Release
- (추가) Jenkins로 자동화 배포 환경 설정 w/ Tag Push Base
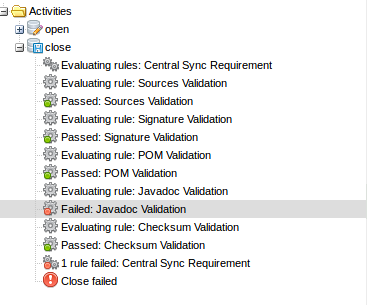
사실 위의 과정은 다른 레퍼런스를 검색하면 흔하게 나오는 순서랑 비슷하다. 하지만 Javadoc을 포함하는 단계는 상대적으로 레퍼런스가 적은 편인 것 같다. 이 Javadoc이 배포 내용에 없으면 Nexus Repository Manager에서 최종 배포 내용 확인 후 등록하는 과정에서 Javadoc Validation 에러가 발생하게 된다. 그래서 Gradle의 Task를 추가해서, dokka라는 Javadoc을 생성해주는 Library를 통해 Artifact하는 시점에 같이 Javadoc도 포함할 수 있도록 할 예정이다. 다음은 Nexus Repository Manager에서 Javadoc Validation 에러 사진이다.
#1 Sonatype JIRA 계정 생성 및 티켓 생성
1. Sonatype Jira - Signup에서 계정을 생성하고 로그인 후 상단 만들기 버튼을 통해 Jira 티켓 생성 페이지로 진입한다.

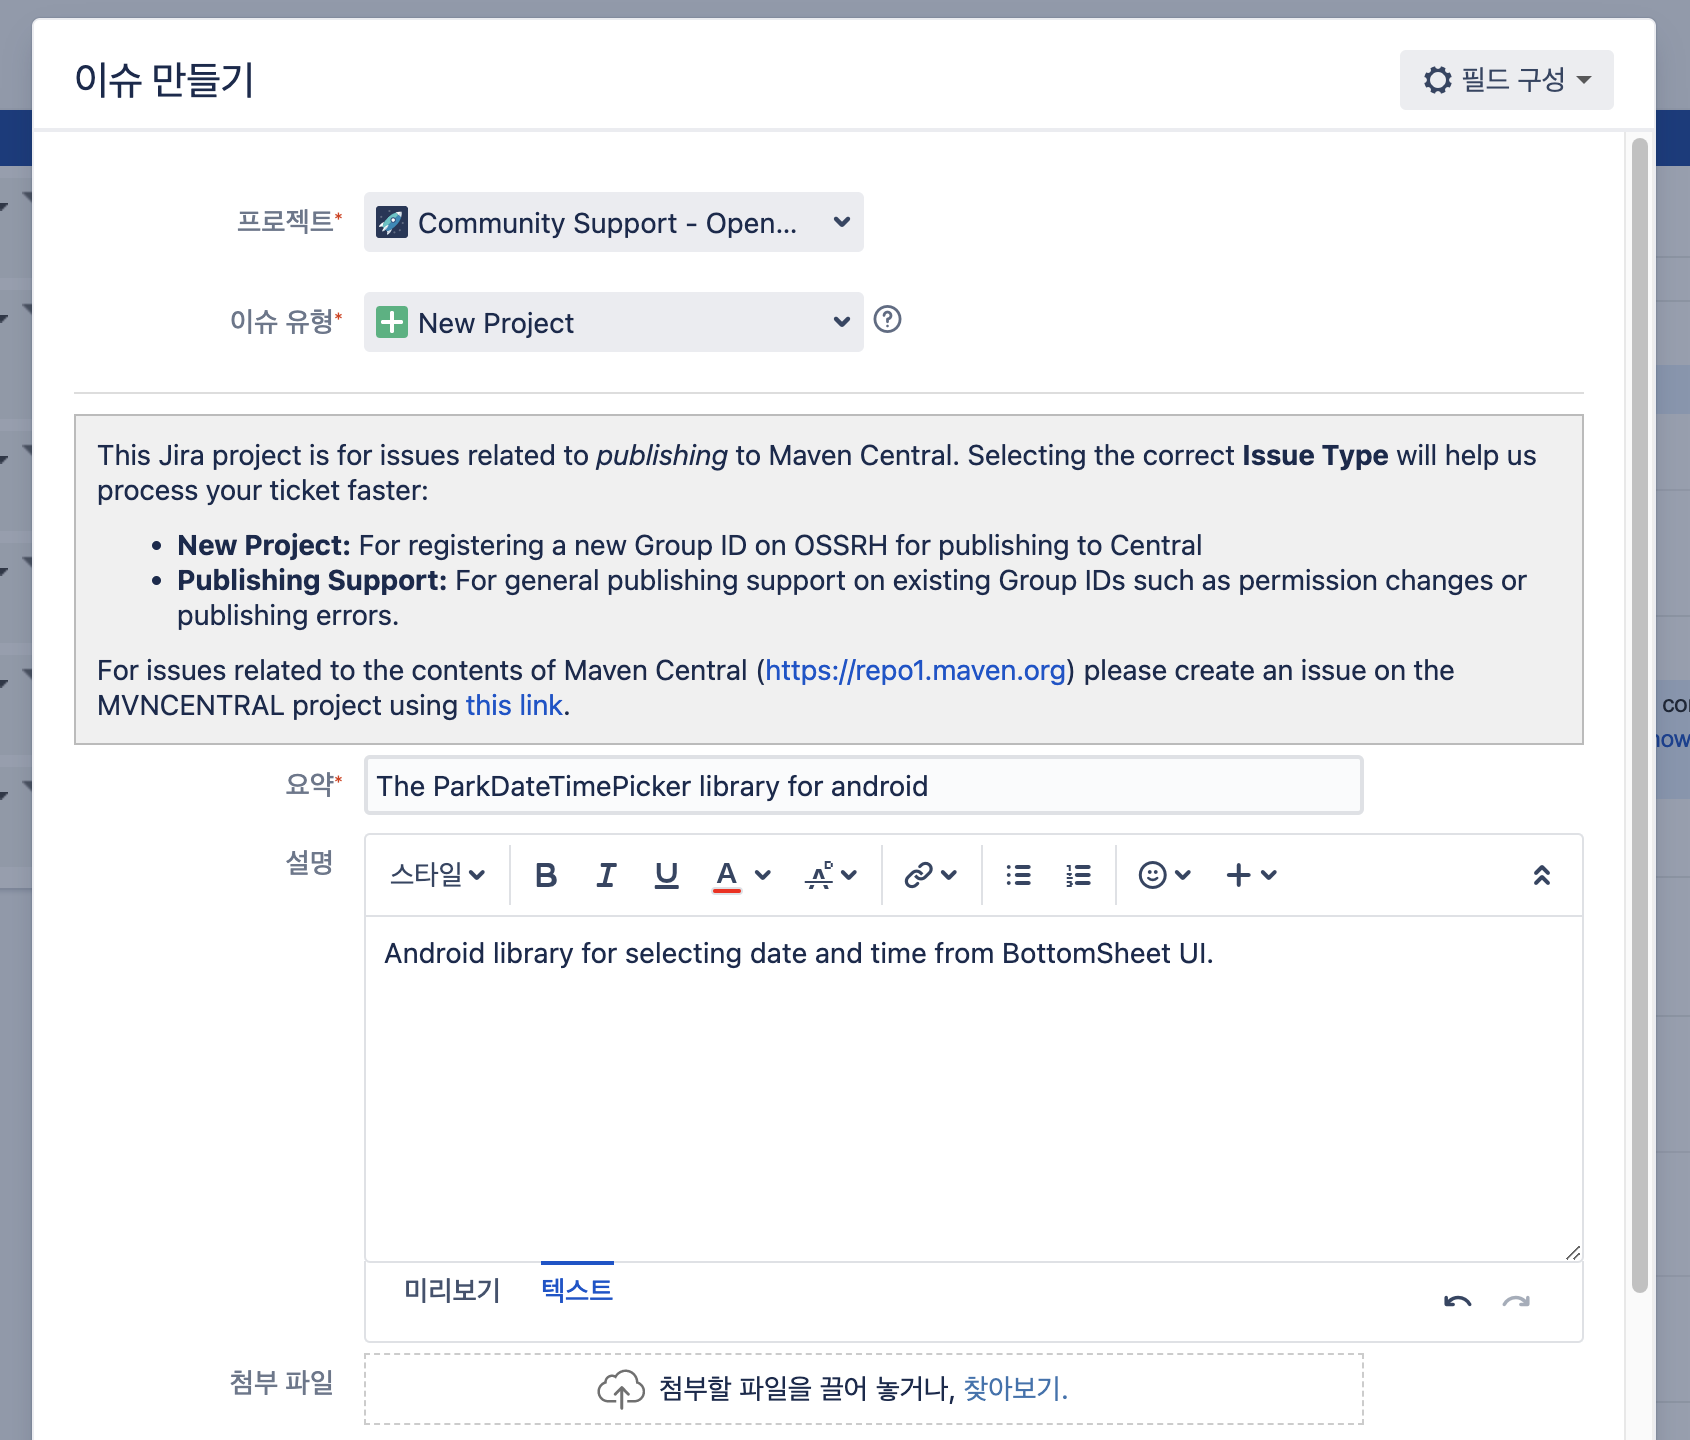
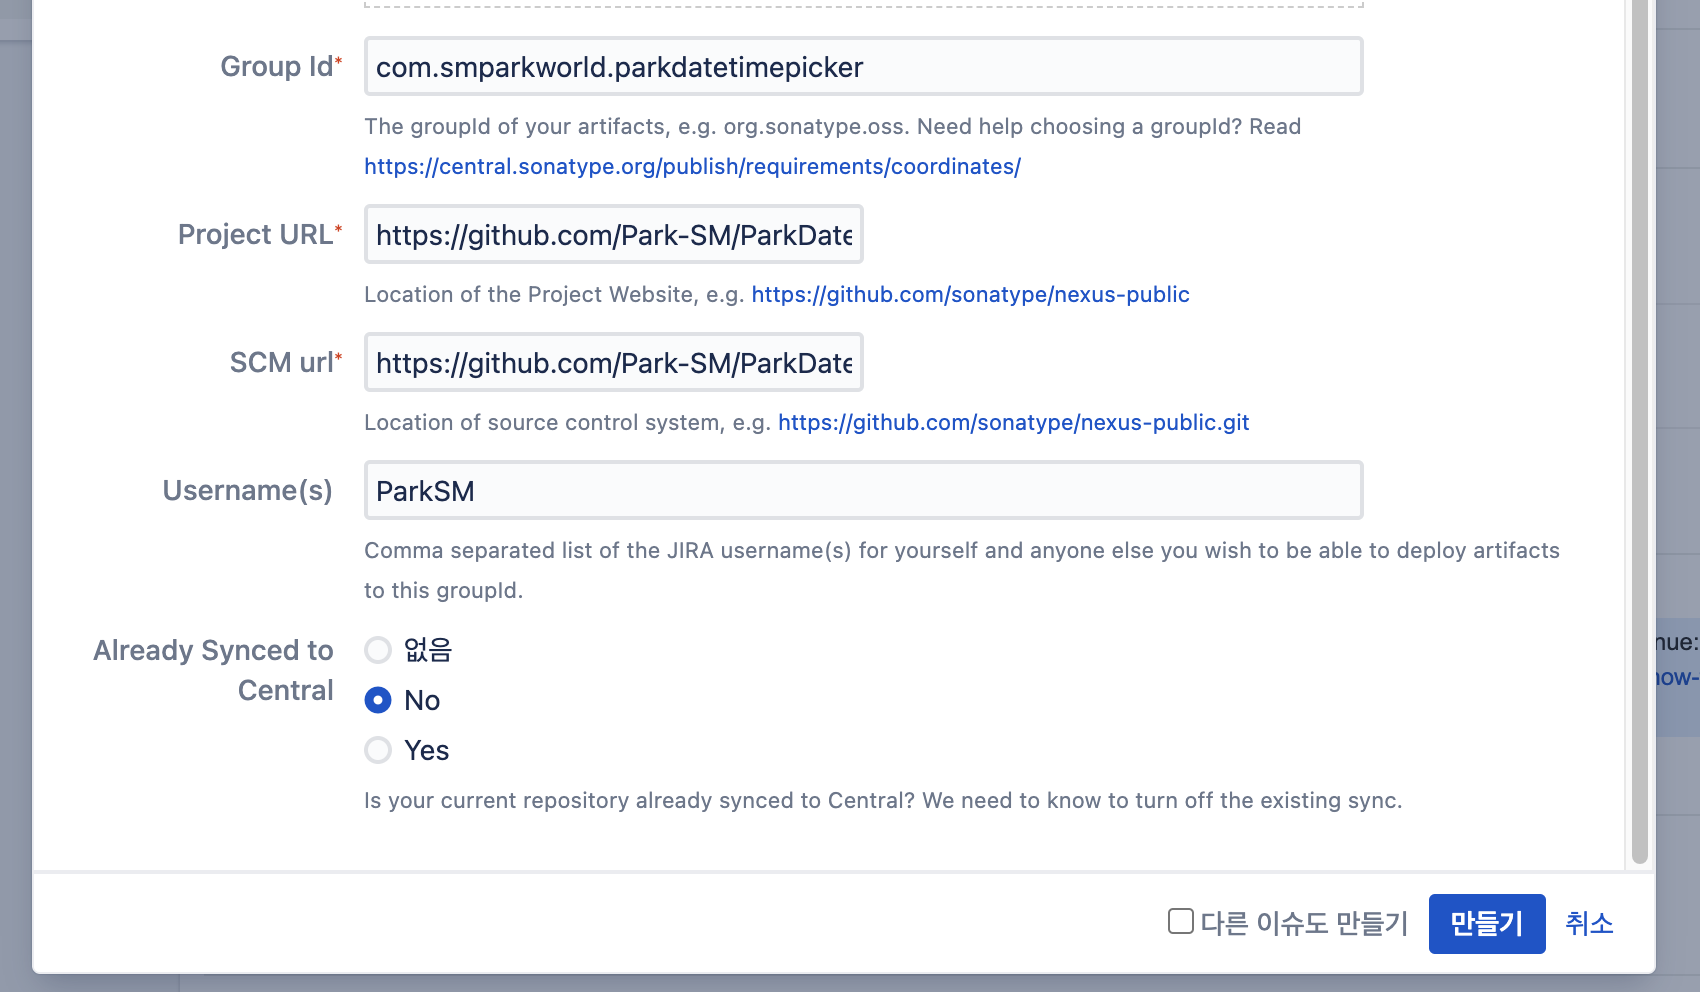
2. 아래의 사진과 같이 값을 입력하고 하단의 만들기 버튼을 클릭한다. 생각보다 예시나 설명이 친절하게 되어있어서 참고하기 쉽다.
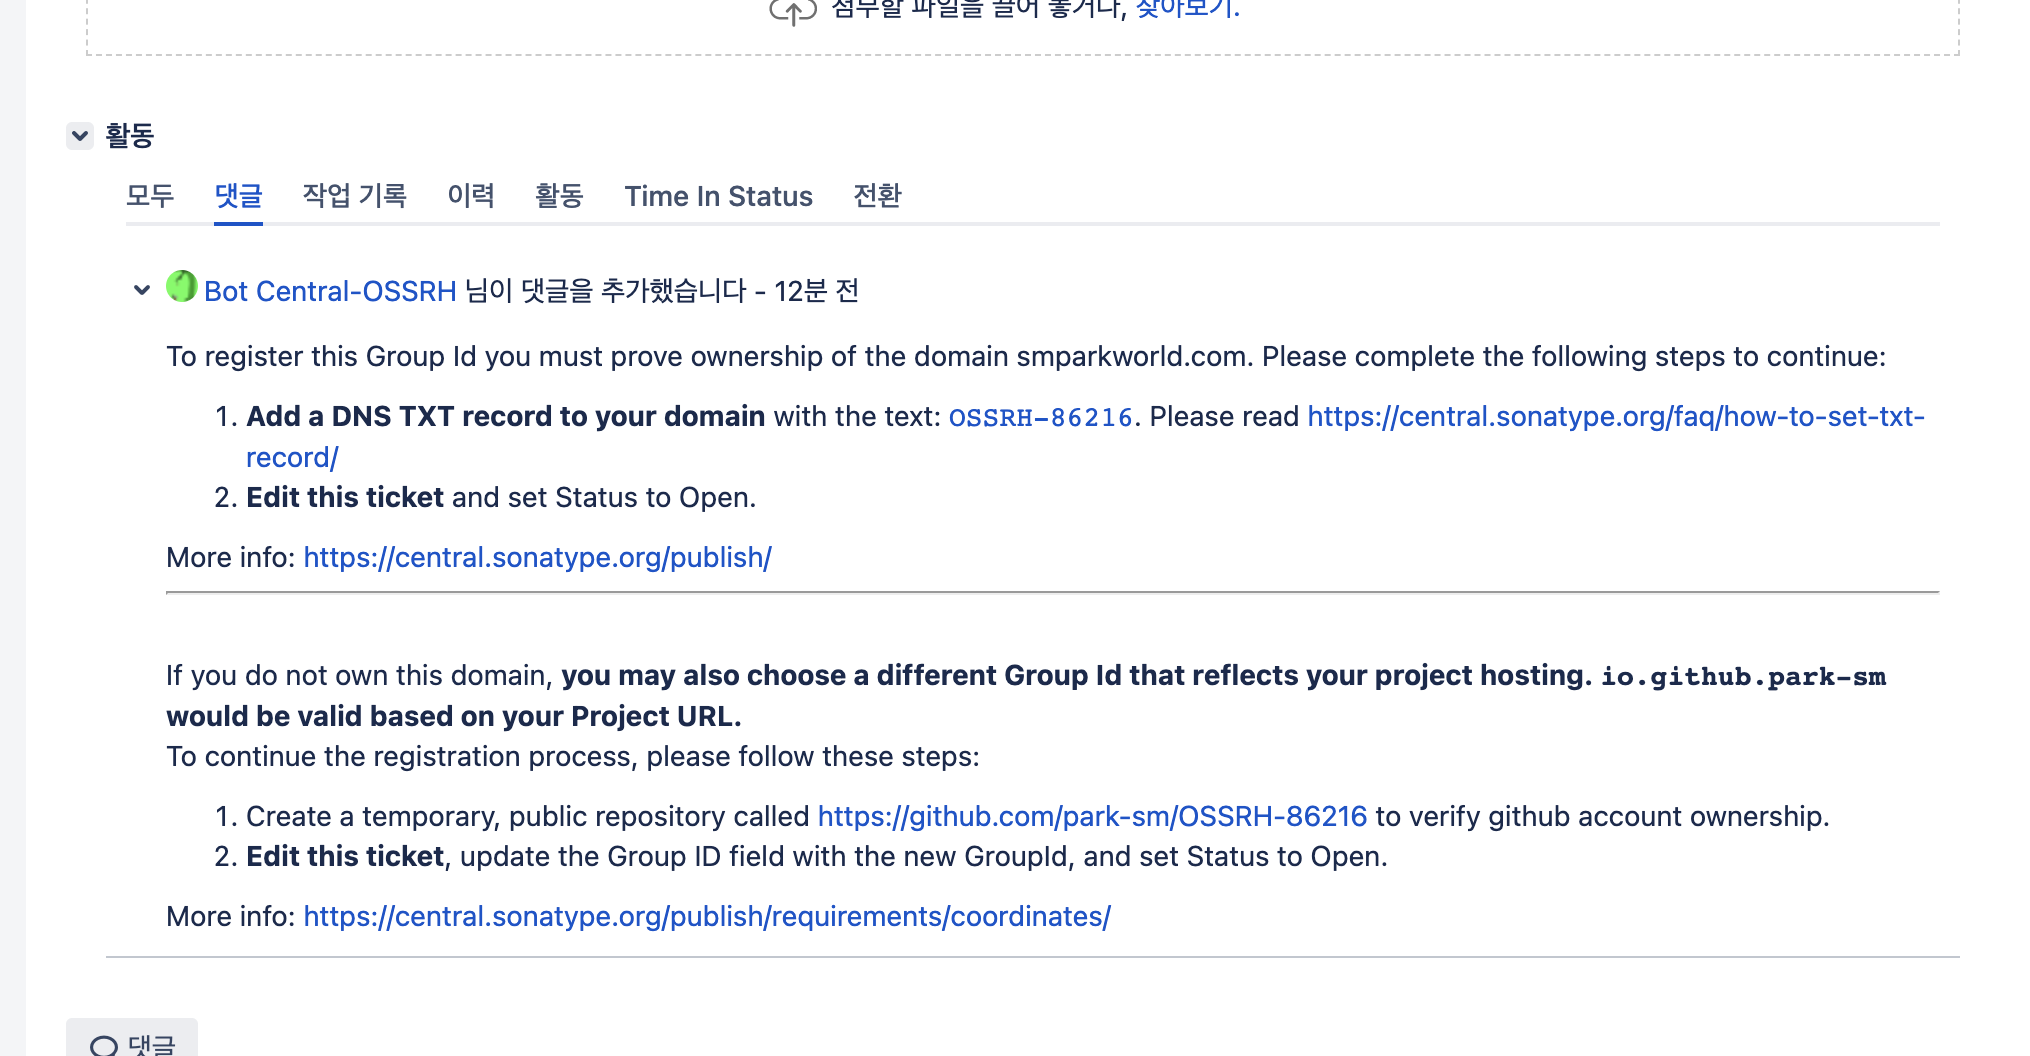
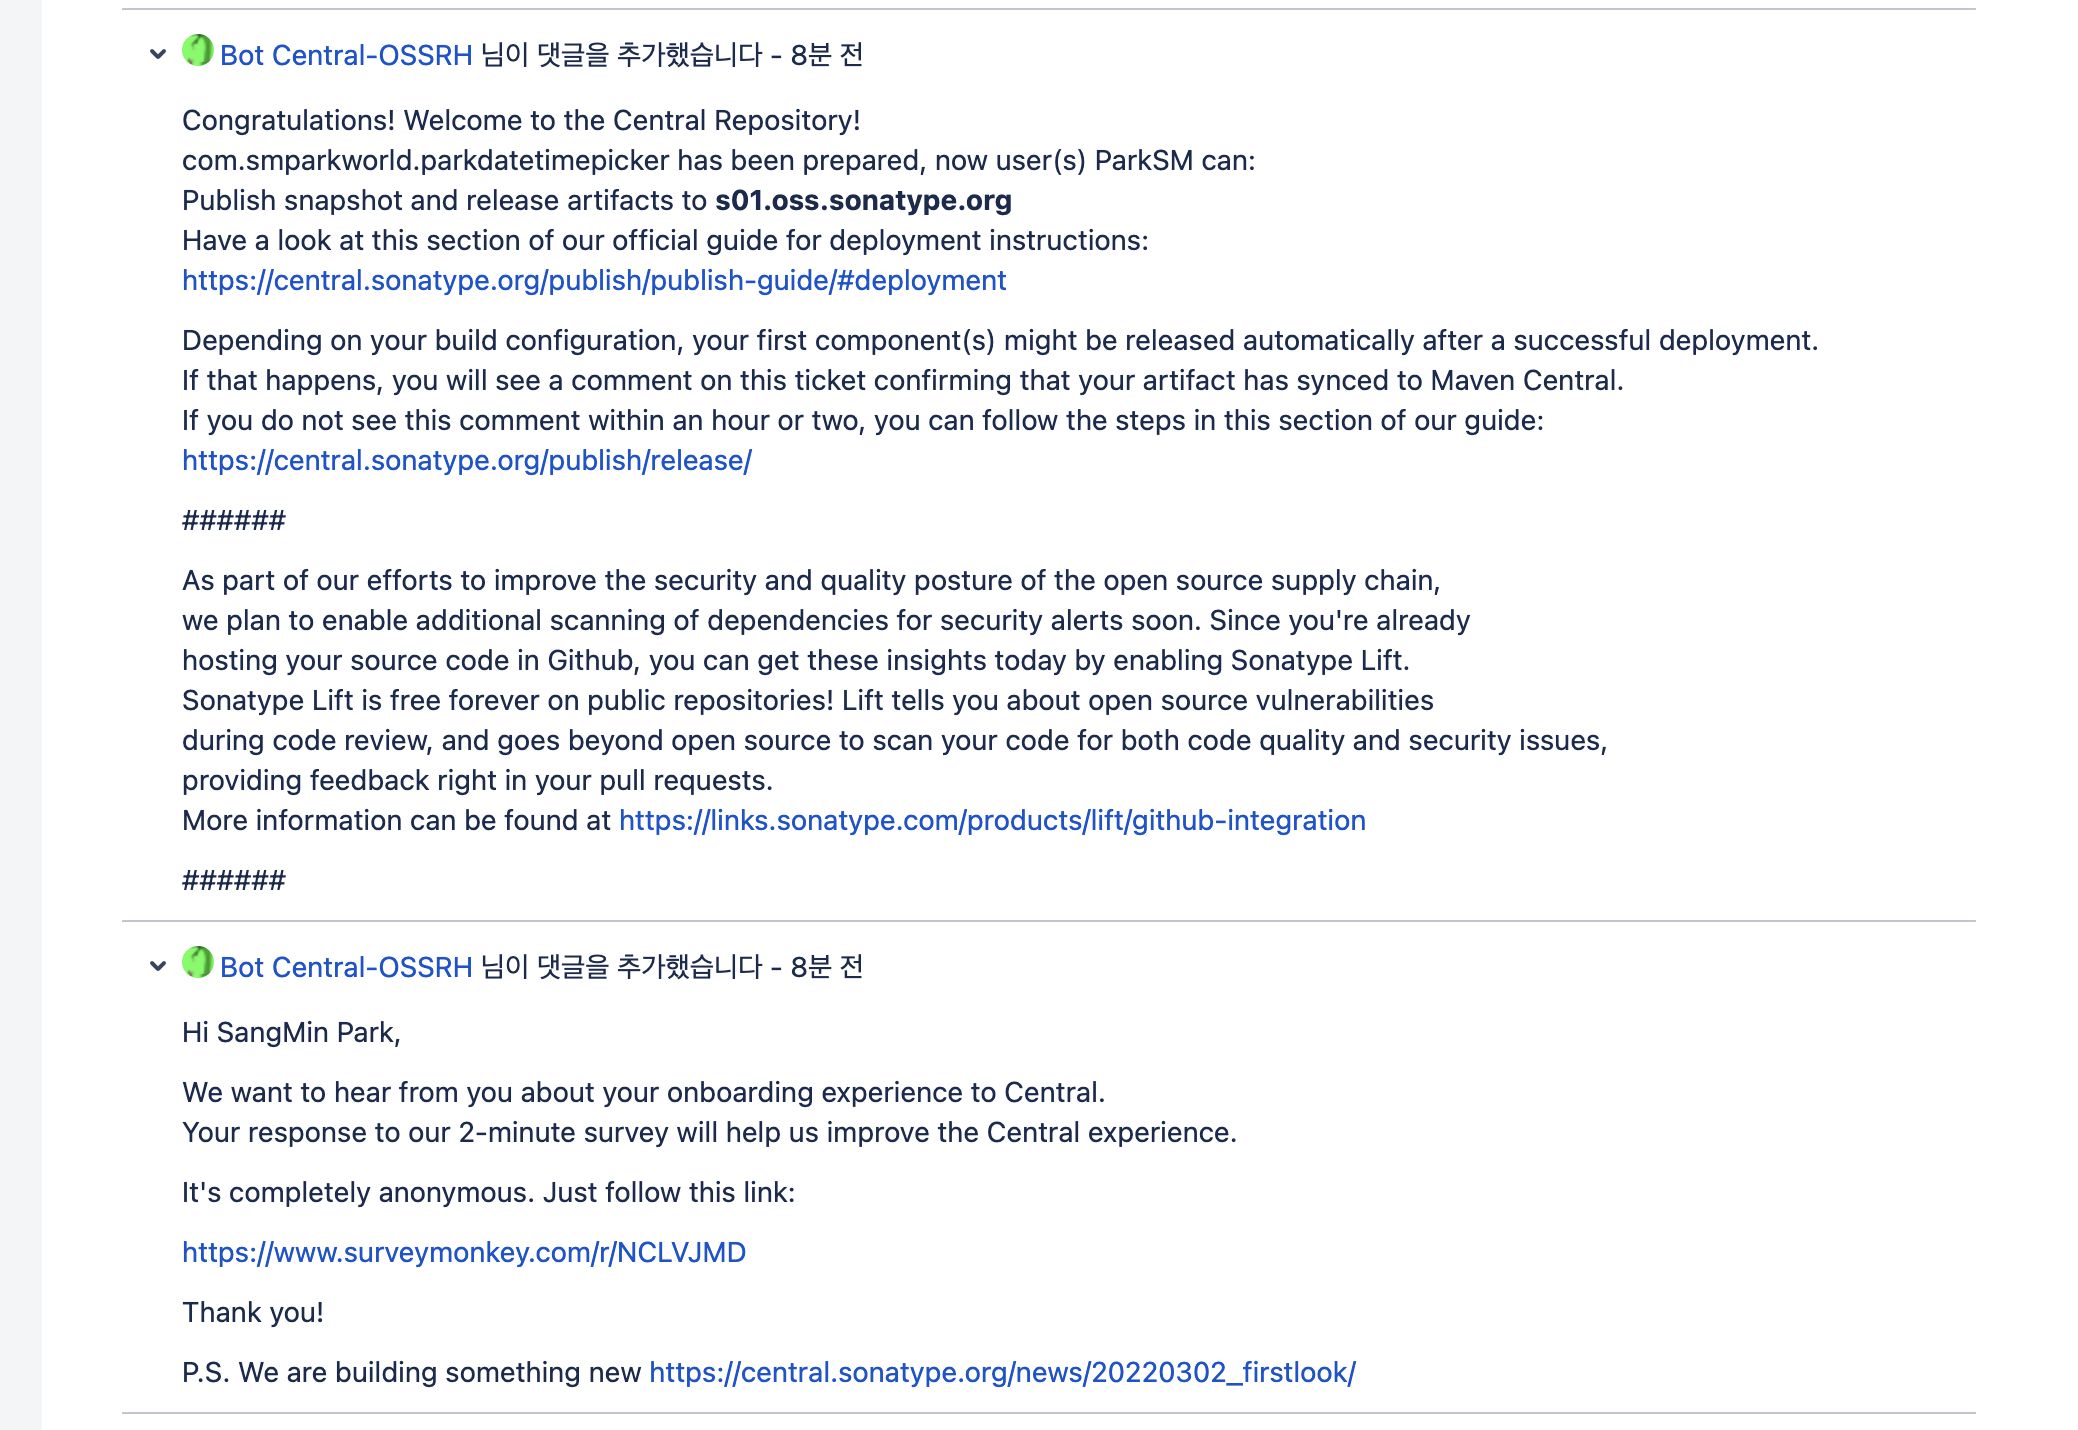
3. 그 다음 대략 5분 정도가 지나면 봇이 다음과 같이 도메인을 인증하라는 댓글을 달아준다. 그러면 그 댓글의 내용을 참고해서 인증하면 된다. 필자와 동일하게 가비아에서 도메인을 호스팅하고 있는 경우 가비아 사이트의 DNS 관리툴에서 TXT를 추가하고 아래 사진 속 댓글의 내용처럼 text를 입력 및 저장한 뒤, 다시 Jira 티켓으로 돌아와서 상단의 Respond을 클릭한다. github.io를 이용하는 경우 본인 Github 계정 로그인 > 아래 사진 속 댓글 글처럼 OSSRH-{티켓 ID} 이름의 public repository 생성 후 Respond을 클릭한다.

4. Respond를 클릭하고 5분 뒤면 라이브러리 배포를 위한 repository를 생성했다고 봇이 댓글을 달아준다.
#2 GPG key 생성
1. GPG Key를 생성하기 위해서 먼저 GPG를 설치한다. 가볍게 구글링해보면 설치하는 법을 찾을 수 있고, mac의 경우 터미널에서 다음과 같이 설치한다.
$ brew install gnupg2
2. GPG Key 생성을 위해 다음과 같이 명령어를 입력하고 1번 RSA 타입으로 생성한다.
$ gpg --full-gen-key
gpg (GnuPG/MacGPG2) 2.3.34; Copyright (C) 2022 g10 Code GmbH
This is free software: you are free to change and redistribute it.
There is NO WARRANTY, to the extent permitted by law.

Please select what kind of key you want:
  (1) RSA and RSA
  (2) DSA and Elgamal
  (3) DSA (sign only)
  (4) RSA (sign only)
  (9) ECC (sign and encrypt) *default*
(10) ECC (sign only)
(14) Existing key from card
Your selection? 1
3. 다음과 같이 4096 비트 길이로 Key Size를 지정한다.
RSA keys may be between 1024 and 4096 bits long.
What keysize do you want? (3072) 4096
4. 그리고 해당 키의 만료기간을 입력한다. 필자는 만료기간을 지정하지 않았다.
Please specify how long the key should be valid.
         0 = key does not expire
        = key expires in n days
      w = key expires in n weeks
      m = key expires in n months
      y = key expires in n years
Key is valid for? (0) 0
Key does not expire at all
Is this correct? (y/N) y
5. 다음과 같이 GPG Key에 대한 User 정보를 입력하면 GPG Key의 암호를 입력하는 팝업창이 뜨는데, 해당 팝업창에서 암호를 지정한다.
GnuPG needs to construct a user ID to identify your key.

Real name: ParkSM
Email address: park97.sm@gmail.com
Comment: For XXXX library deploy.
You selected this USER-ID:
    "ParkSM (For XXXX library deploy.) "

Change (N)ame, (C)omment, (E)mail or (O)kay/(Q)uit? O
6. 그러면 다음과 같이 GPG Key에 대한 정보가 출력된다. 아래의 pub이라고 써져있는 곳에 보면 rsa4096 밑에 긴 키 값이 있는데 뒤에서 8자리 글자가 GPG Key ID가 되므로 따로 메모한다. (아래 정보 기준으로 하면 90ABCDEF가 된다.)
We need to generate a lot of random bytes. It is a good idea to perform
some other action (type on the keyboard, move the mouse, utilize the
disks) during the prime generation; this gives the random number
generator a better chance to gain enough entropy.
We need to generate a lot of random bytes. It is a good idea to perform
some other action (type on the keyboard, move the mouse, utilize the
disks) during the prime generation; this gives the random number
generator a better chance to gain enough entropy.
gpg: revocation certificate stored as '/Users/sangmin.park/.gnupg/openpgp-revocs.d/ABCDEFG1234567890ABCDEFG1234567890ABCDEF.rev'
public and secret key created and signed.

pub   rsa4096 2022-11-14 [SC]
      ABCDEFG1234567890ABCDEFG1234567890ABCDEF
uid                      ParkSM (For XXXX library deploy.)
sub   rsa4096 2022-11-14 [E]
7. 위에서 생성한 GPG Key를 ubuntu keyserver에 등록한다. 마지막 8자리는 위 6번 과정에서 확인한 GPG Key ID이다.
$ gpg --keyserver keyserver.ubuntu.com --send-keys 90ABCDEF
8. 위의 과정에서 생성한 GPG Key, GPG Key ID, GPG Key Password를 따로 메모해둔다.
이 정보들은 추후 Android Studio의 local.properties 파일 안에 저장해서 로컬에서 Nexus Repository Manager로 업로드 할 수 있고 Jenkins의 Credentials로 저장해서 CI를 구축할 수도 있다.
#3 배포할 라이브러리에 배포 관련 Script 작성 및 배포 w/ GPG key
1. 다음과 같이 Top-level build.gradle 파일에 Nexus로 Publish 할 수 있는 Gradle plugin과 javadocs를 생성해주는 dokka Gradle plugin을 추가한다.
중간에 보이는 apply from에 대한 2줄은 다음 2번 과정에서 추가될 파일들이라서 우선 같이 작성해주고 넘어가면 된다.
// Top-level build file where you can add configuration options common to all sub-projects/modules.
plugins {
    id 'com.android.application'                  version '7.2.1'   apply false
    id 'com.android.library'                      version '7.2.1'   apply false
    id 'org.jetbrains.kotlin.android'             version '1.7.10'  apply false
    id 'org.jetbrains.dokka'                      version '1.7.0'   apply true
    id 'io.github.gradle-nexus.publish-plugin'    version '1.1.0'   apply true
}

apply from: "${rootDir}/scripts/publish-root.gradle"
apply from: 'publish.gradle'

task clean(type: Delete) {
    delete rootProject.buildDir
}
2. 미리 준비된 배포할 Android Library 프로젝트의 최상단 디렉토리에 publish.gradle 파일을 생성하고 아래의 내용을 알맞게 채운다. 아래의 내용 중에서 라이브러리 설명, Github 계정 ID, Repository 이름, 개발자 정보 등만 바꾸면 된다.
ext {
    PUBLISH_DESCRIPTION = 'Android library for selecting date and time from BottomSheet UI.'
    PUBLISH_URL = 'https://github.com/Park-SM/ParkDateTimePicker'
    PUBLISH_LICENSE_NAME = 'Apache License 2.0'
    PUBLISH_LICENSE_URL = 'https://github.com/Park-SM/ParkDateTimePicker/blob/main/LICENSE'

    PUBLISH_DEVELOPER_ID = 'ParkSM'
    PUBLISH_DEVELOPER_NAME = 'SangMin Park'
    PUBLISH_DEVELOPER_EMAIL = 'park97.sm@gmail.com'

    PUBLISH_SCM_CONNECTION = 'scm:git:github.com/Park-SM/ParkDateTimePicker.git'
    PUBLISH_SCM_DEVELOPER_CONNECTION = 'scm:git:ssh://github.com:Park-SM/ParkDateTimePicker.git'
    PUBLISH_SCM_URL = 'https://github.com/Park-SM/ParkDateTimePicker/tree/main'
}
3. 미리 준비된 배포할 Android Library 프로젝트 안에 scripts라는 디렉토리를 하나 만들고 아래의 두 파일을 복붙하여 추가한다.
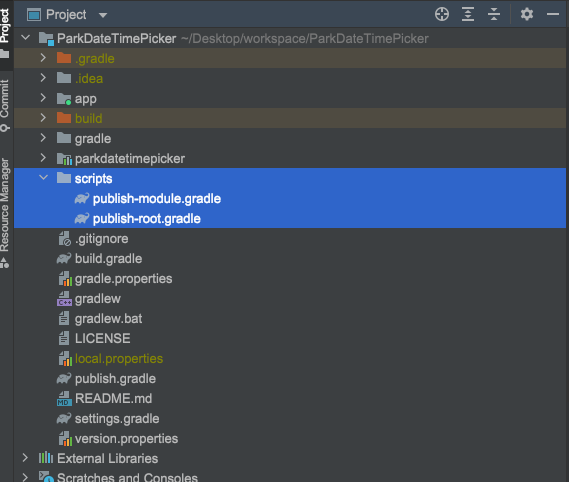
- publish-module.gradle
apply plugin: 'maven-publish'
apply plugin: 'signing'

task androidSourcesJar(type: Jar) {
    archiveClassifier.set('sources')
    if (project.plugins.findPlugin("com.android.library")) {
        // For Android libraries
        from android.sourceSets.main.java.srcDirs
        from android.sourceSets.main.kotlin.srcDirs
    } else {
        // For pure Kotlin libraries, in case you have them
        from sourceSets.main.java.srcDirs
        from sourceSets.main.kotlin.srcDirs
    }
}

task androidJavadocJar(type: Jar) {
    archiveClassifier.set('javadoc')
    from "$buildDir/dokka/javadoc"
}

artifacts {
    archives androidSourcesJar
    archives androidJavadocJar
}

group = PUBLISH_GROUP_ID
version = PUBLISH_VERSION

afterEvaluate {
    publishing {
        publications {
            release(MavenPublication) {

                groupId PUBLISH_GROUP_ID
                artifactId PUBLISH_ARTIFACT_ID
                version PUBLISH_VERSION

                if (project.plugins.findPlugin("com.android.library")) {
                    from components.release
                } else {
                    artifact("$buildDir/libs/${project.getName()}-${version}.jar")
                }

                artifact androidSourcesJar
                artifact androidJavadocJar

                pom {
                    name = PUBLISH_ARTIFACT_ID
                    description = PUBLISH_DESCRIPTION
                    url = PUBLISH_URL
                    licenses {
                        license {
                            name = PUBLISH_LICENSE_NAME
                            url = PUBLISH_LICENSE_URL
                        }
                    }
                    developers {
                        developer {
                            id = PUBLISH_DEVELOPER_ID
                            name = PUBLISH_DEVELOPER_NAME
                            email = PUBLISH_DEVELOPER_EMAIL
                        }
                    }

                    scm {
                        connection = PUBLISH_SCM_CONNECTION
                        developerConnection = PUBLISH_SCM_DEVELOPER_CONNECTION
                        url = PUBLISH_SCM_URL
                    }
                }
            }
        }
    }
}

signing {
    sign publishing.publications
}
- publish-root.gradle
// Create variables with empty default values
ext["signing.keyId"] = ''
ext["signing.password"] = ''
ext["signing.key"] = ''
ext["ossrhUsername"] = ''
ext["ossrhPassword"] = ''
ext["sonatypeStagingProfileId"] = ''

File secretPropsFile = project.rootProject.file('local.properties')
if (secretPropsFile.exists()) {
    // Read local.properties file first if it exists
    Properties p = new Properties()
    new FileInputStream(secretPropsFile).withCloseable { is -> p.load(is) }
    p.each { name, value -> ext[name] = value }
} else {
    // Use system environment variables
    ext["ossrhUsername"] = System.getenv('ossrhUsername')
    ext["ossrhPassword"] = System.getenv('ossrhPassword')
    ext["sonatypeStagingProfileId"] = System.getenv('sonatypeStagingProfileId')
    ext["signing.keyId"] = System.getenv('signing_keyId')
    ext["signing.password"] = System.getenv('signing_password')
    ext["signing.secretKeyRingFile"] = System.getenv('signing_secretKeyRingFile')
}

// Set up Sonatype repository
nexusPublishing {
    repositories {
        sonatype {
            stagingProfileId = sonatypeStagingProfileId
            username = ossrhUsername
            password = ossrhPassword
            nexusUrl.set(uri("https://s01.oss.sonatype.org/service/local/"))
            snapshotRepositoryUrl.set(uri("https://s01.oss.sonatype.org/content/repositories/snapshots/"))
        }
    }
}
4. 미리 준비된 배포할 Android Library 프로젝트의 최상단 디렉토리에 version.properties 파일을 생성하고 다음과 같이 입력한다. 추후에 버전 변경하면서 배포할 때 이 파일의 버전 이름만 변경하면 된다.
VERSION_NAME = 1.0.0
5. 배포할 Android Libraray Module에 대한 build.gradle 안에 다음 내용을 참고해서 버전 관련한 스크립트를 추가한다.
- 상단 plugins에서
dokkagradle plugin 추가하기 getVersion()함수 추가하기- ext 랑 apply from을 추가해서 배포 버전 관련 환경 변수 설정 및 module publish gradle 적용
plugins {
    id 'com.android.library'
    id 'org.jetbrains.kotlin.android'
    id 'org.jetbrains.dokka'
}

android {
    ...
}

def getVersion() {
    def versionPropsFile = rootProject.file("version.properties")
    if (versionPropsFile.exists()) {

        def versionProps = new Properties()
        versionProps.load(new FileInputStream(versionPropsFile))

        return hasProperty('versionName') ? versionName : versionProps['VERSION_NAME']
    } else {
        throw new GradleException("Not found library version.")
    }
}

ext {
    PUBLISH_GROUP_ID = 'com.smparkworld.parkdatetimepicker'
    PUBLISH_VERSION = getVersion()
    PUBLISH_ARTIFACT_ID = 'parkdatetimepicker'
}

apply from: "${rootDir}/scripts/publish-module.gradle"

java {
    sourceCompatibility = JavaVersion.VERSION_1_8
    targetCompatibility = JavaVersion.VERSION_1_8
}

dependencies {
    ...
}
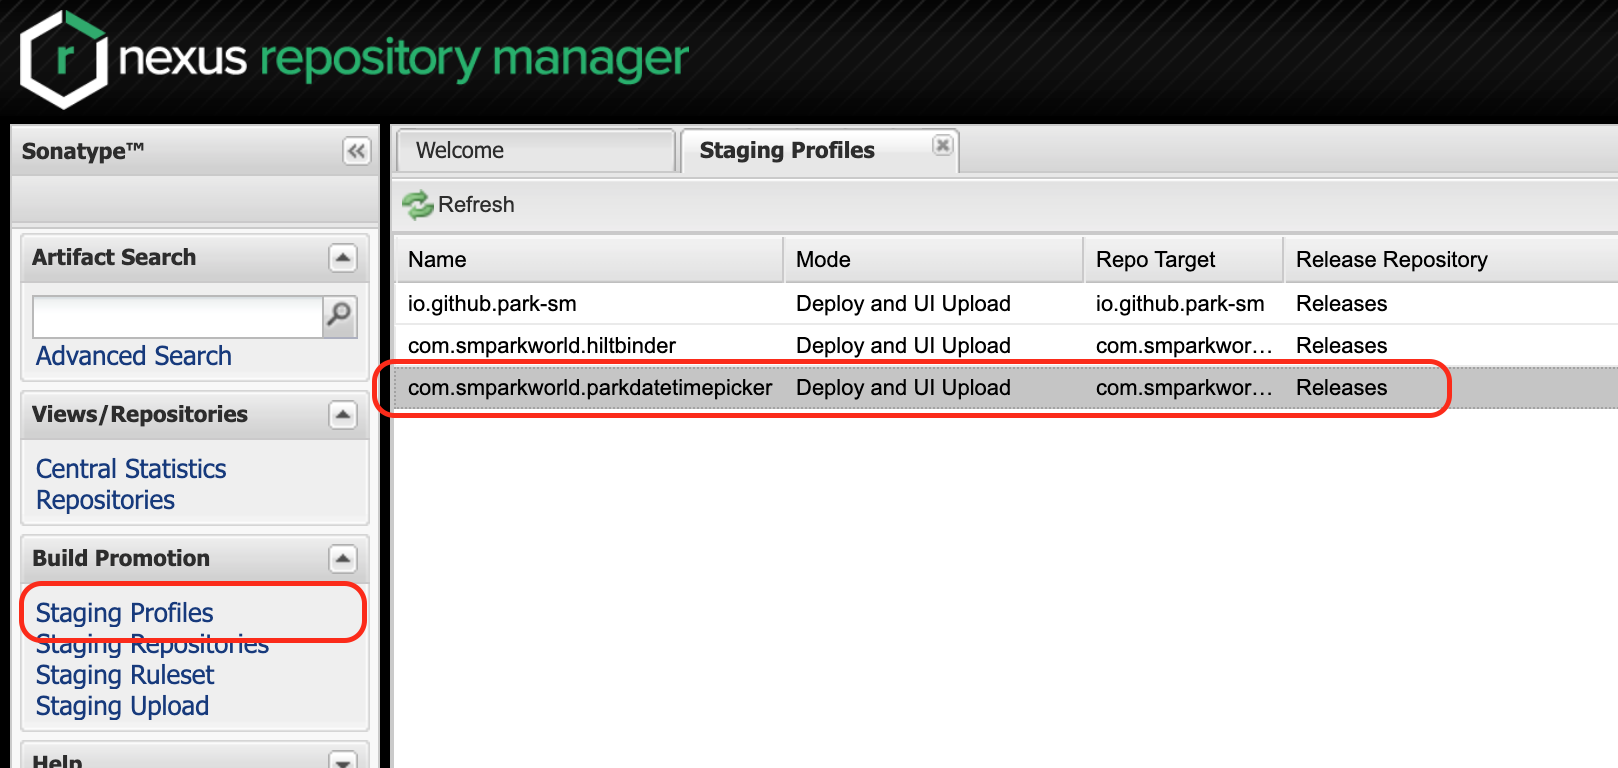
6. Nexus Repsitory Manager에서 위의 #1의 1번에서 생성한 Sonatype Jira 계정과 동일한 ID와 Password로 로그인하고 다음과 같은 과정을 통해 StagingProfileId를 확인한다.
- 우측 상단의 Sign in 버튼을 통해 Sonatype Jira 계정과 동일한 ID와 Password로 로그인
- 좌측 메뉴의 Staging Profiles를 클릭
- 오른쪽 내용에서 배포할 라이브러리 클릭
- 브라우저 주소창에
https://s01.oss.sonatype.org/#stagingProfiles;{StagingProfileId}의 형식으로 변경되는데,StagingProfileId부분을 따로 메모한다.
7. 배포할 Android Library 프로젝트 안의 local.properties 파일에 다음과 같이 입력한다.
(Jenkins를 통해 CI/CD를 구축할 경우 아래의 값들을 Credentials로 저장해두고 Pipeline Script에서 해당 값들을 환경변수로 저장하면 된다.)
## This file is automatically generated by Android Studio.
# Do not modify this file -- YOUR CHANGES WILL BE ERASED!
#
# This file should *NOT* be checked into Version Control Systems,
# as it contains information specific to your local configuration.
#
# Location of the SDK. This is only used by Gradle.
# For customization when using a Version Control System, please read the
# header note.
sdk.dir={Android SDK 경로}

signing.keyId={위의 #2의 8번에서 저장한 GPG Key ID 입력}
signing.password={위의 #2의 8번에서 저장한 GPG Key Password 입력}
signing.secretKeyRingFile={위의 #2의 8번에서 저장한 GPG Key의 절대 경로 입력}
ossrhUsername={위의 #1의 1번에서 생성한 Sonatype Jira 계정 ID 입력}
ossrhPassword={위의 #1의 1번에서 생성한 Sonatype Jira 계정 Password 입력}
sonatypeStagingProfileId={위의 5번에서 확인한 StagingProfileId 입력}
#4 Nexus Repository Manager에 들어가서 배포된 Library 확인 및 Release
1. 다음과 같은 gradlew 명령어를 순서대로 입력하여 배포한다. 아래의 {라이브러리 모듈 이름}은 아래의 사진과 같이 배포할 라이브러리 모듈 이름이다.

## 클린 빌드를 통해 aar 생성, Build Variants를 따로 설정한 경우 assemble{Build Variants}로 사용하면 됨.
$ ./gradlew clean assembleRelease --stacktrace

## dokka gradle plugin을 통해 javadocs 파일을 생성
$ ./gradlew :{라이브러리 모듈 이름}:dokkaJavadoc --stacktrace

## Nexus publish gradle plugin을 통해 업로드
$ ./gradlew :{라이브러리 모듈 이름}:publishReleasePublicationToSonatypeRepository --stacktrace
2. Nexus로 업로드가 완료되면 Nexus Repsitory Manager에 위 과정 중 #3의 6번처럼 로그인 하고 아래의 사진과 같이 들어가서 배포된 것을 확인한다. 아래 사진 중 Content를 클릭해서 배포될 내용들을 확인할 수 있다.
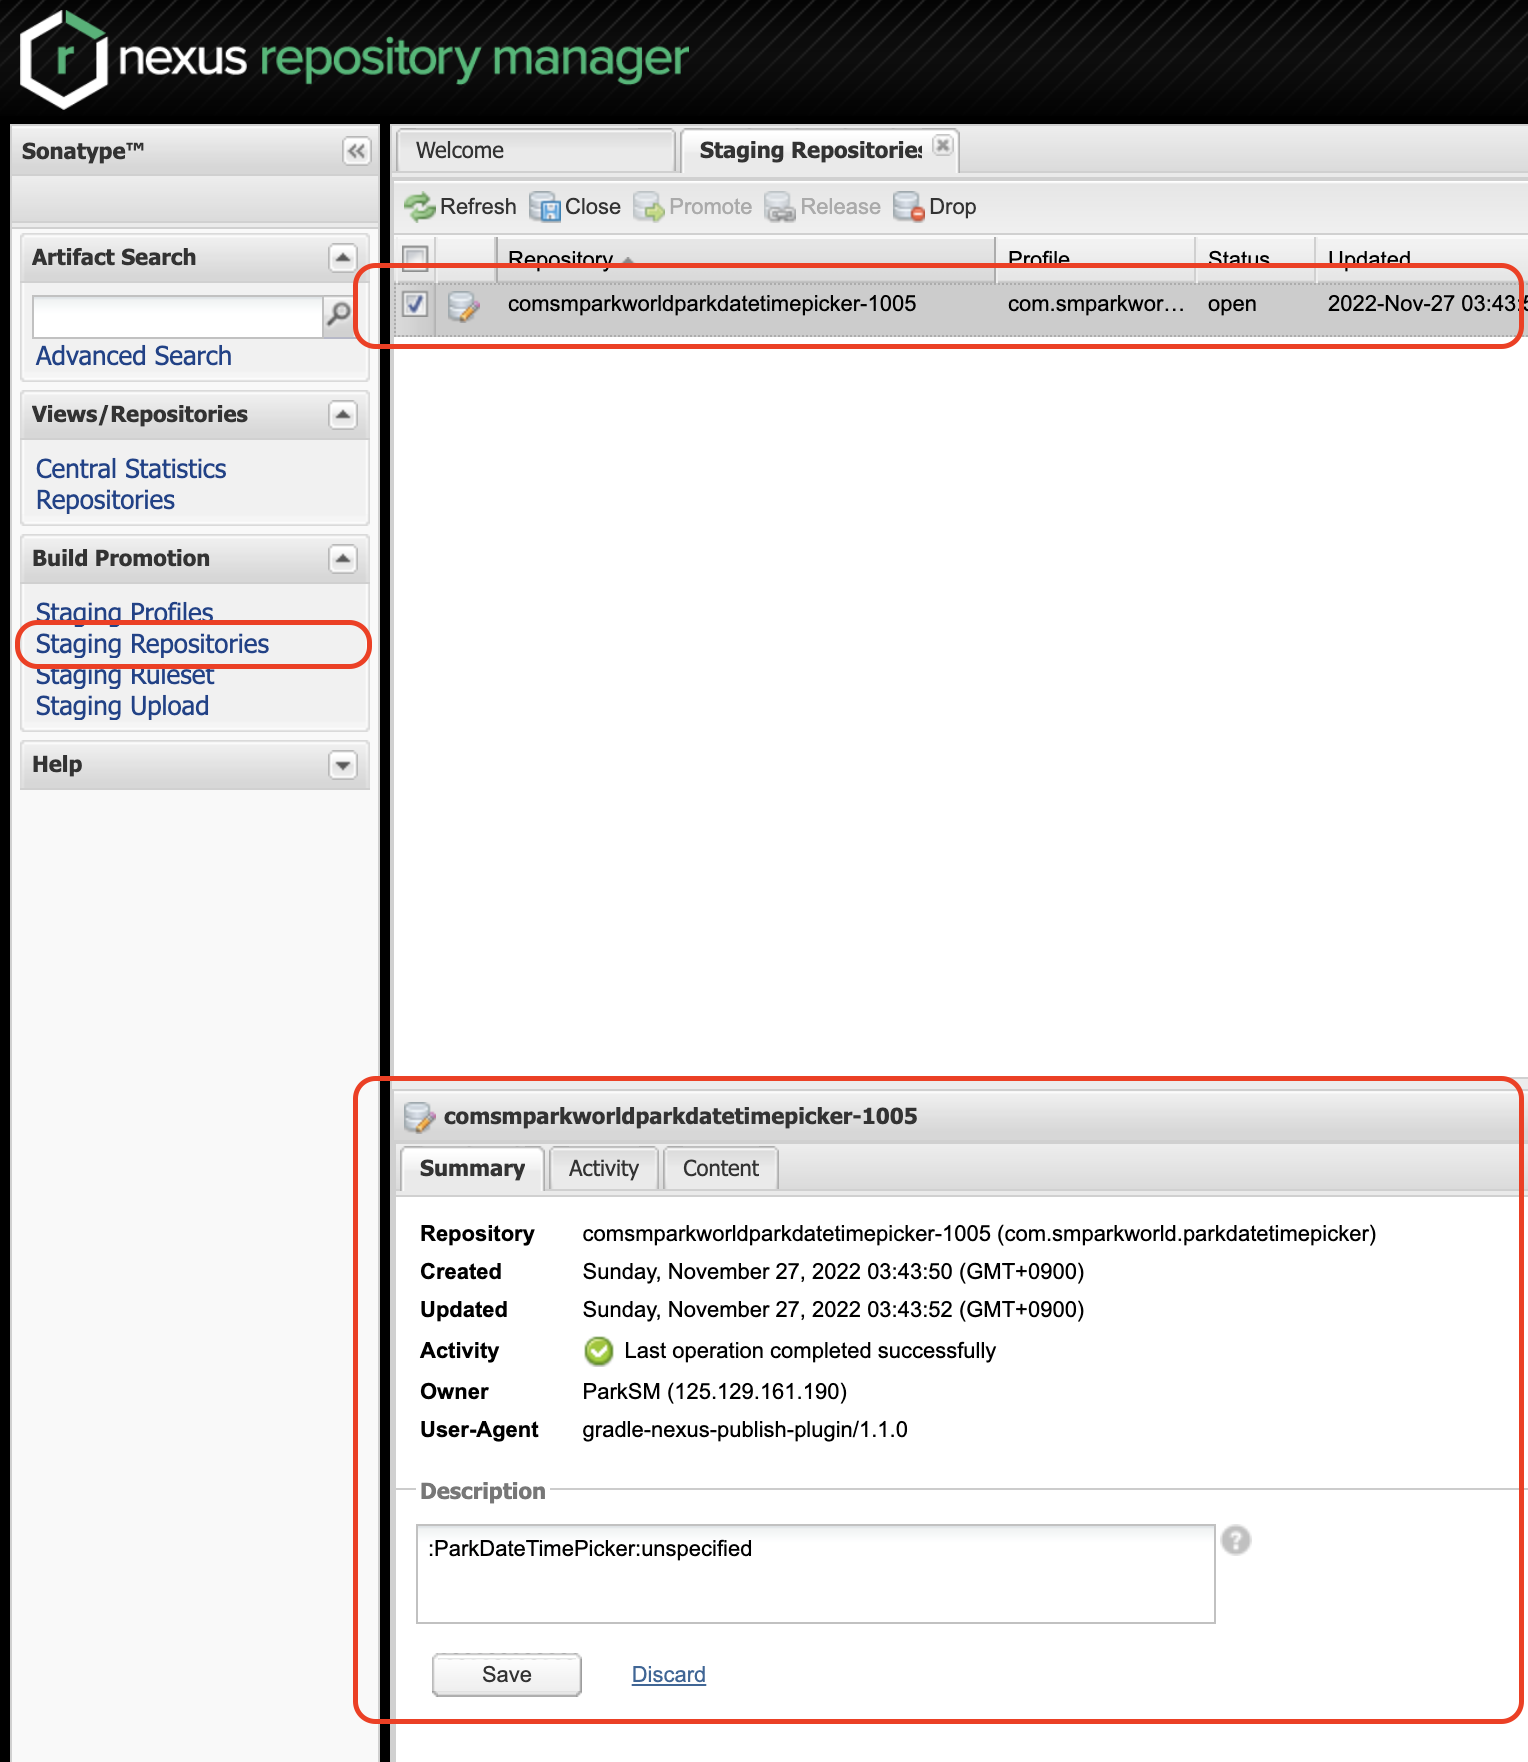
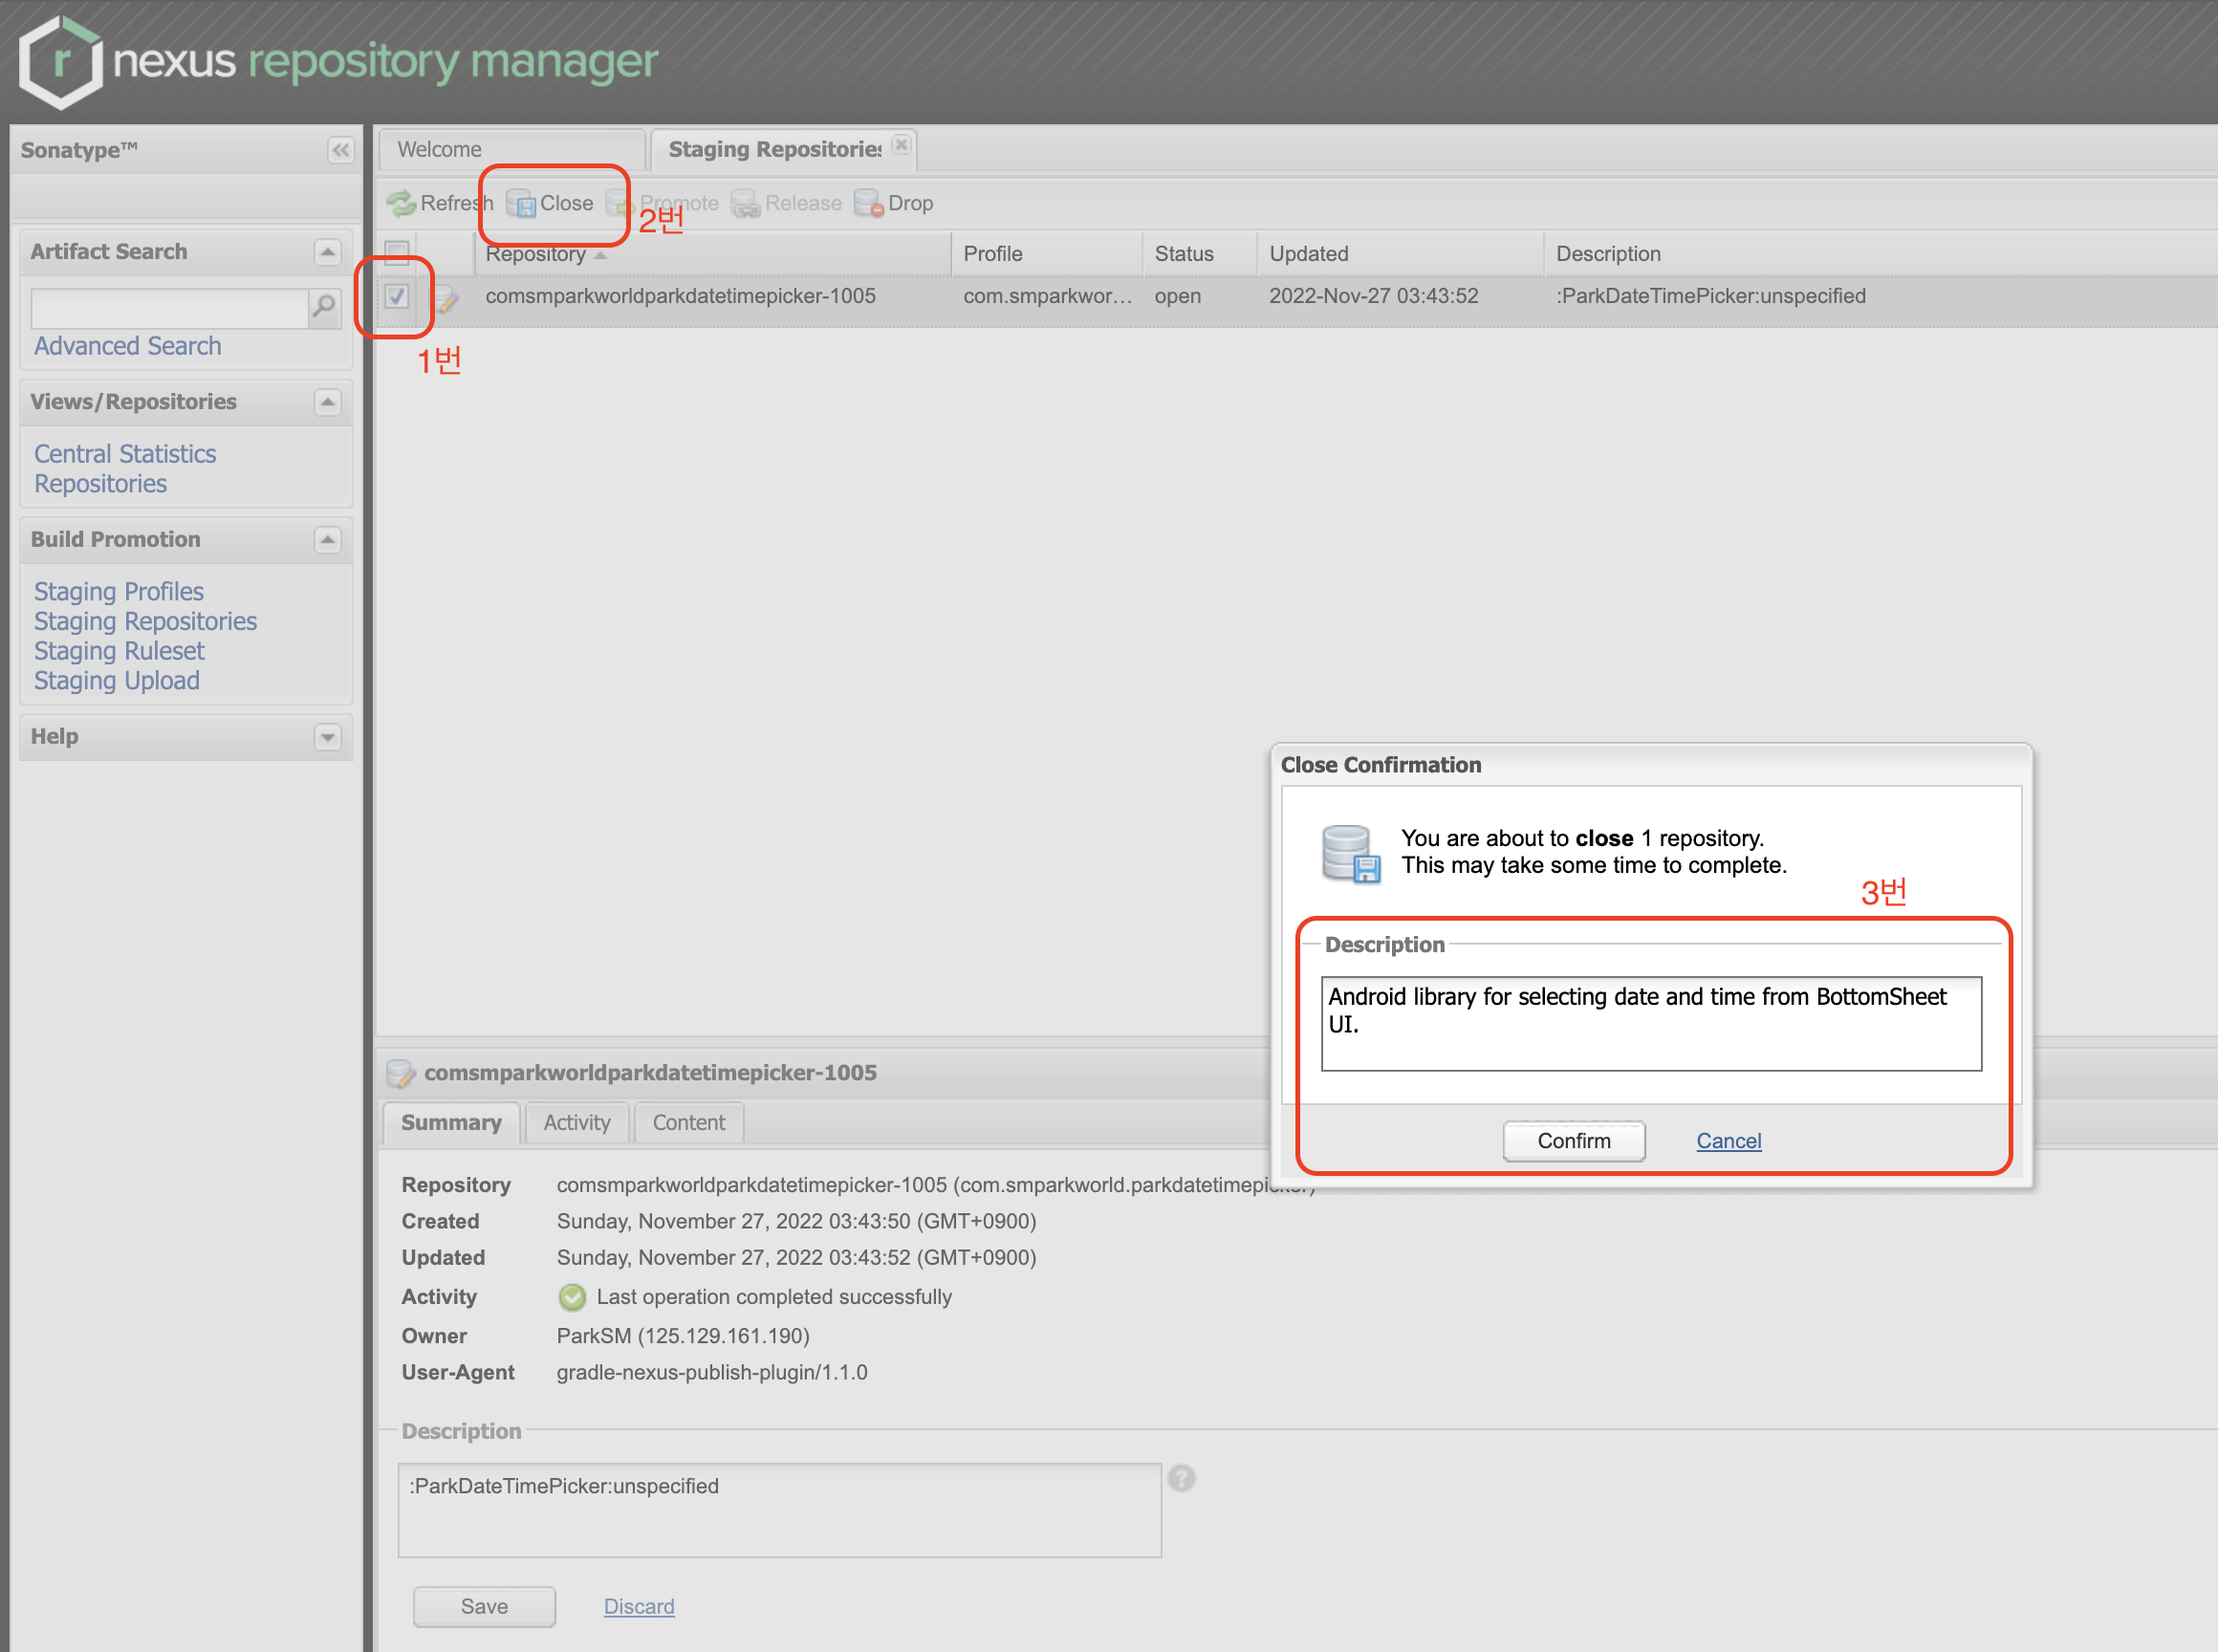
3. 아래의 사진 속 1~3번 과정을 참고하여 배포할 변경 사항을 선택하고 Close를 클릭한다. 그리고 적당한 라이브러리 설명을 입력한 후 Confirm을 클릭한다.
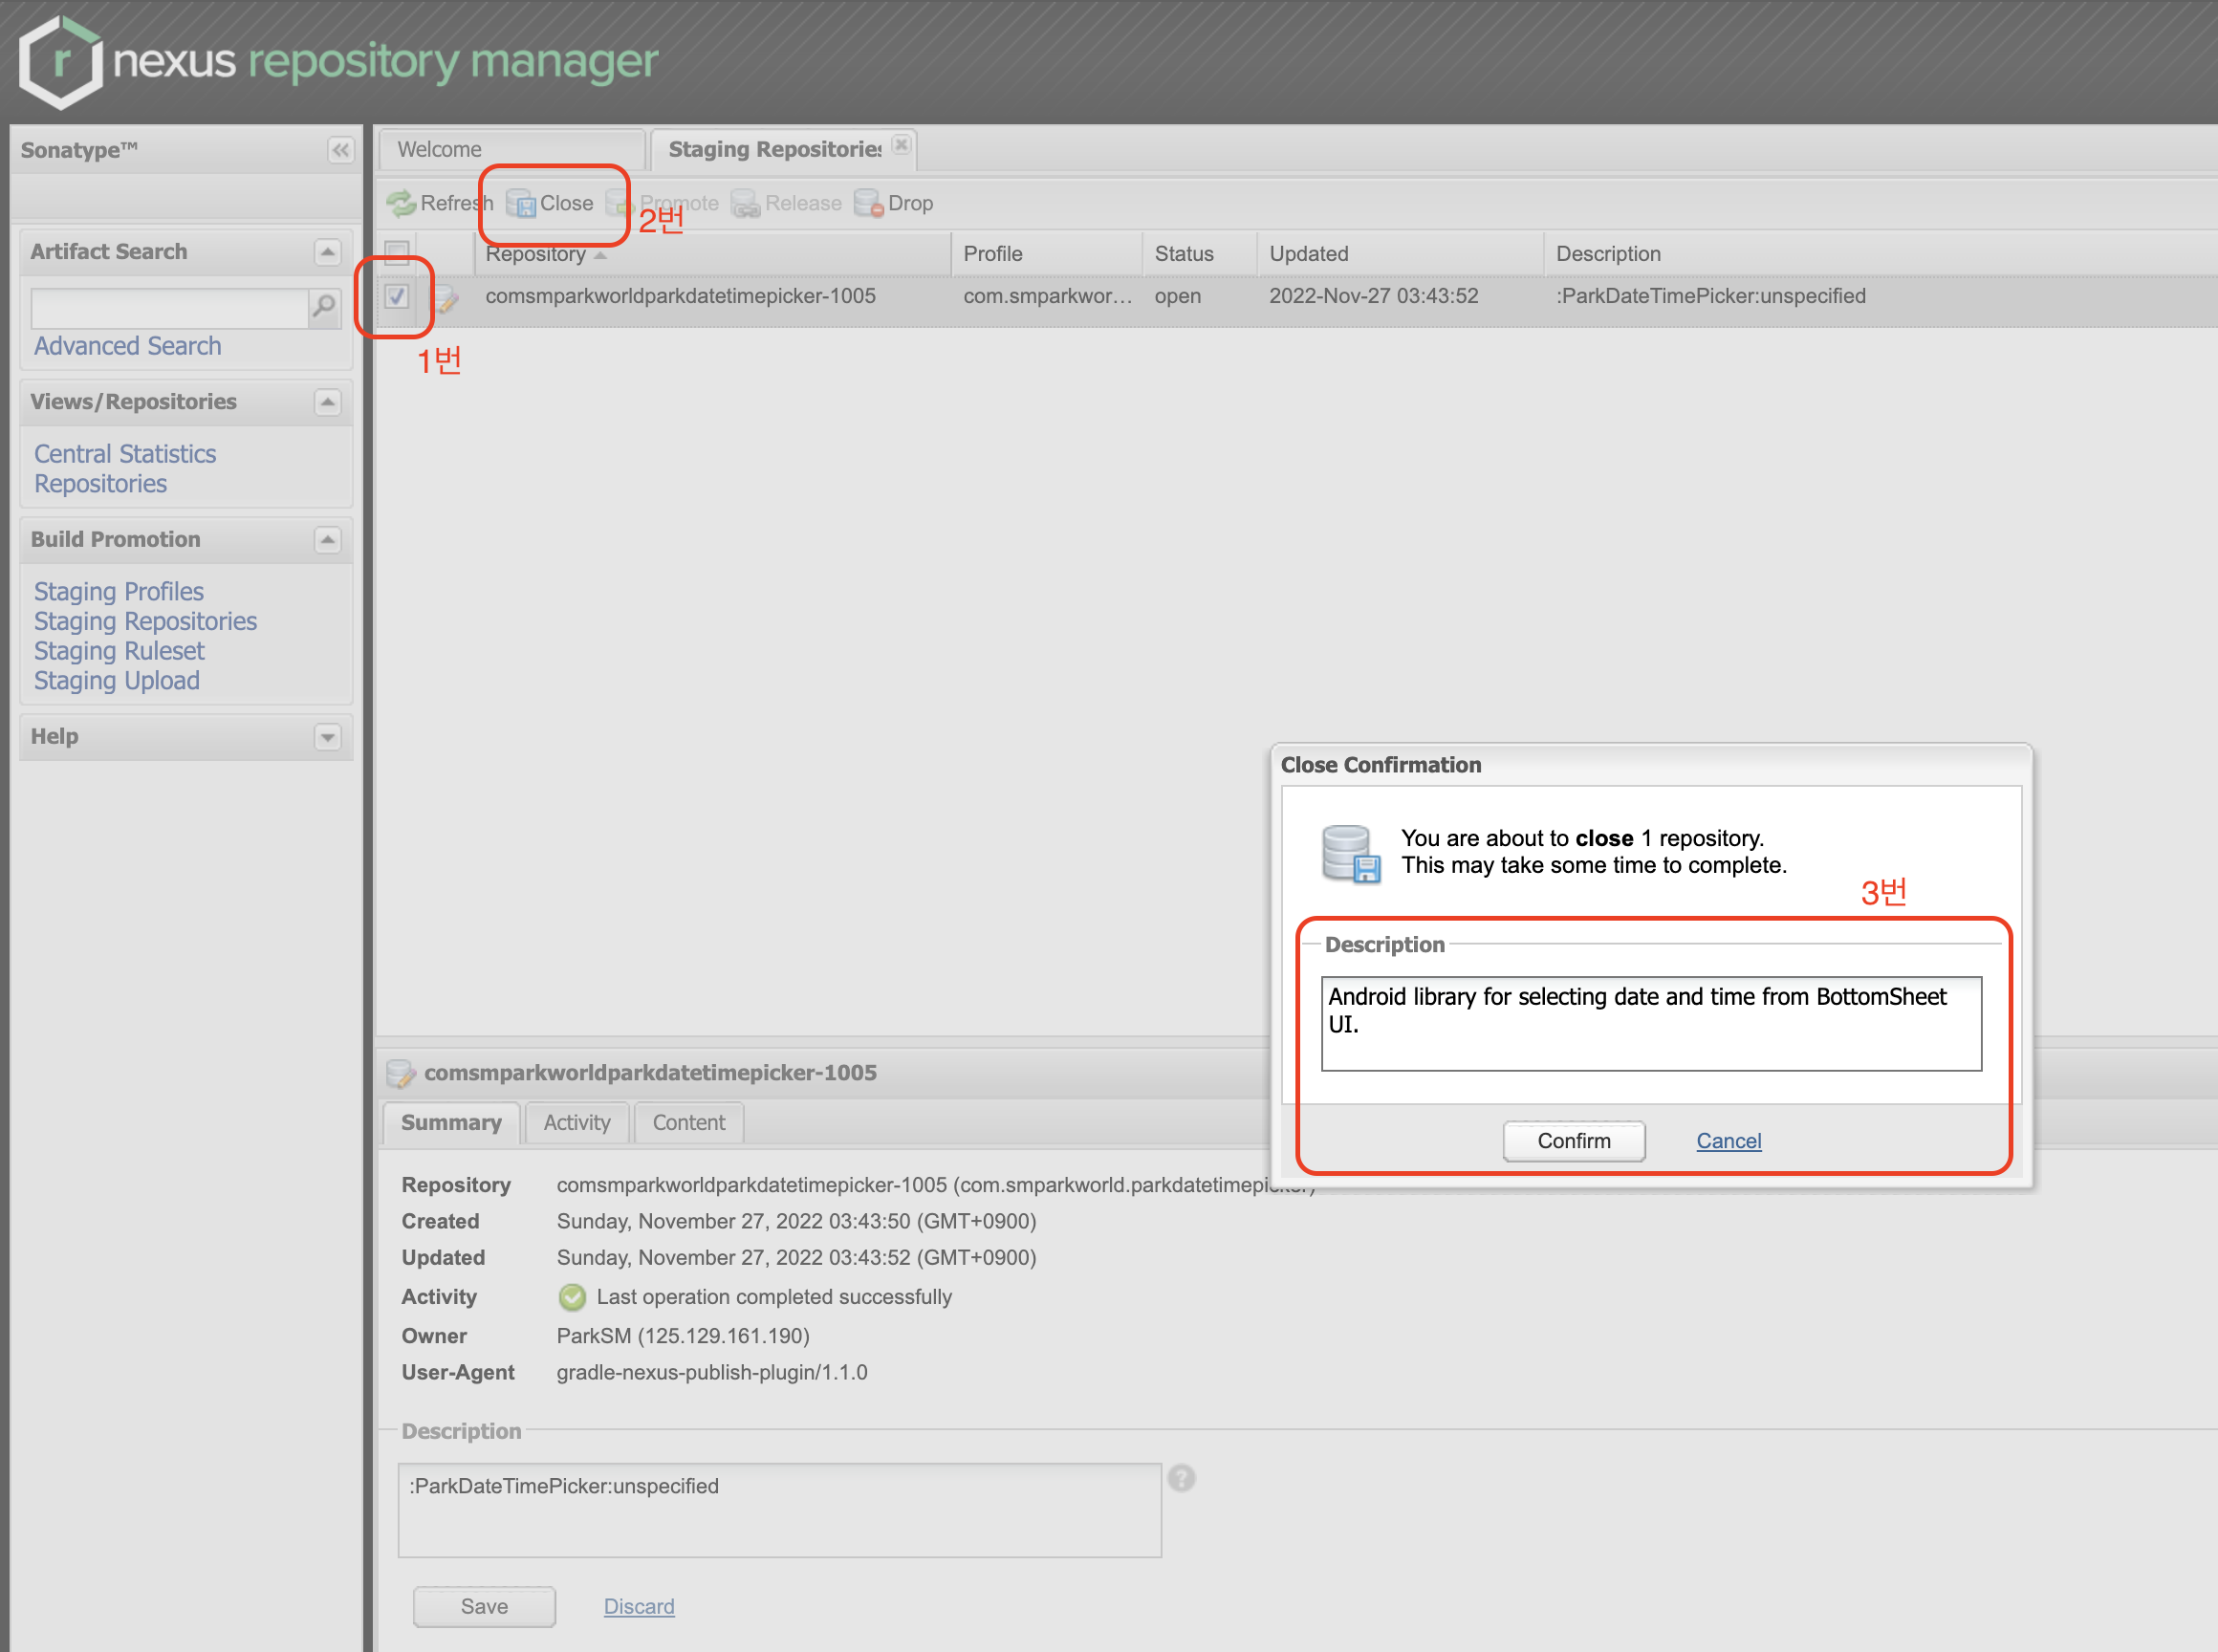
4. 그러면 다음 사진들과 같이 배포할 내용에 대해서 대략 1분 정도 여러가지 검증을 진행한다.
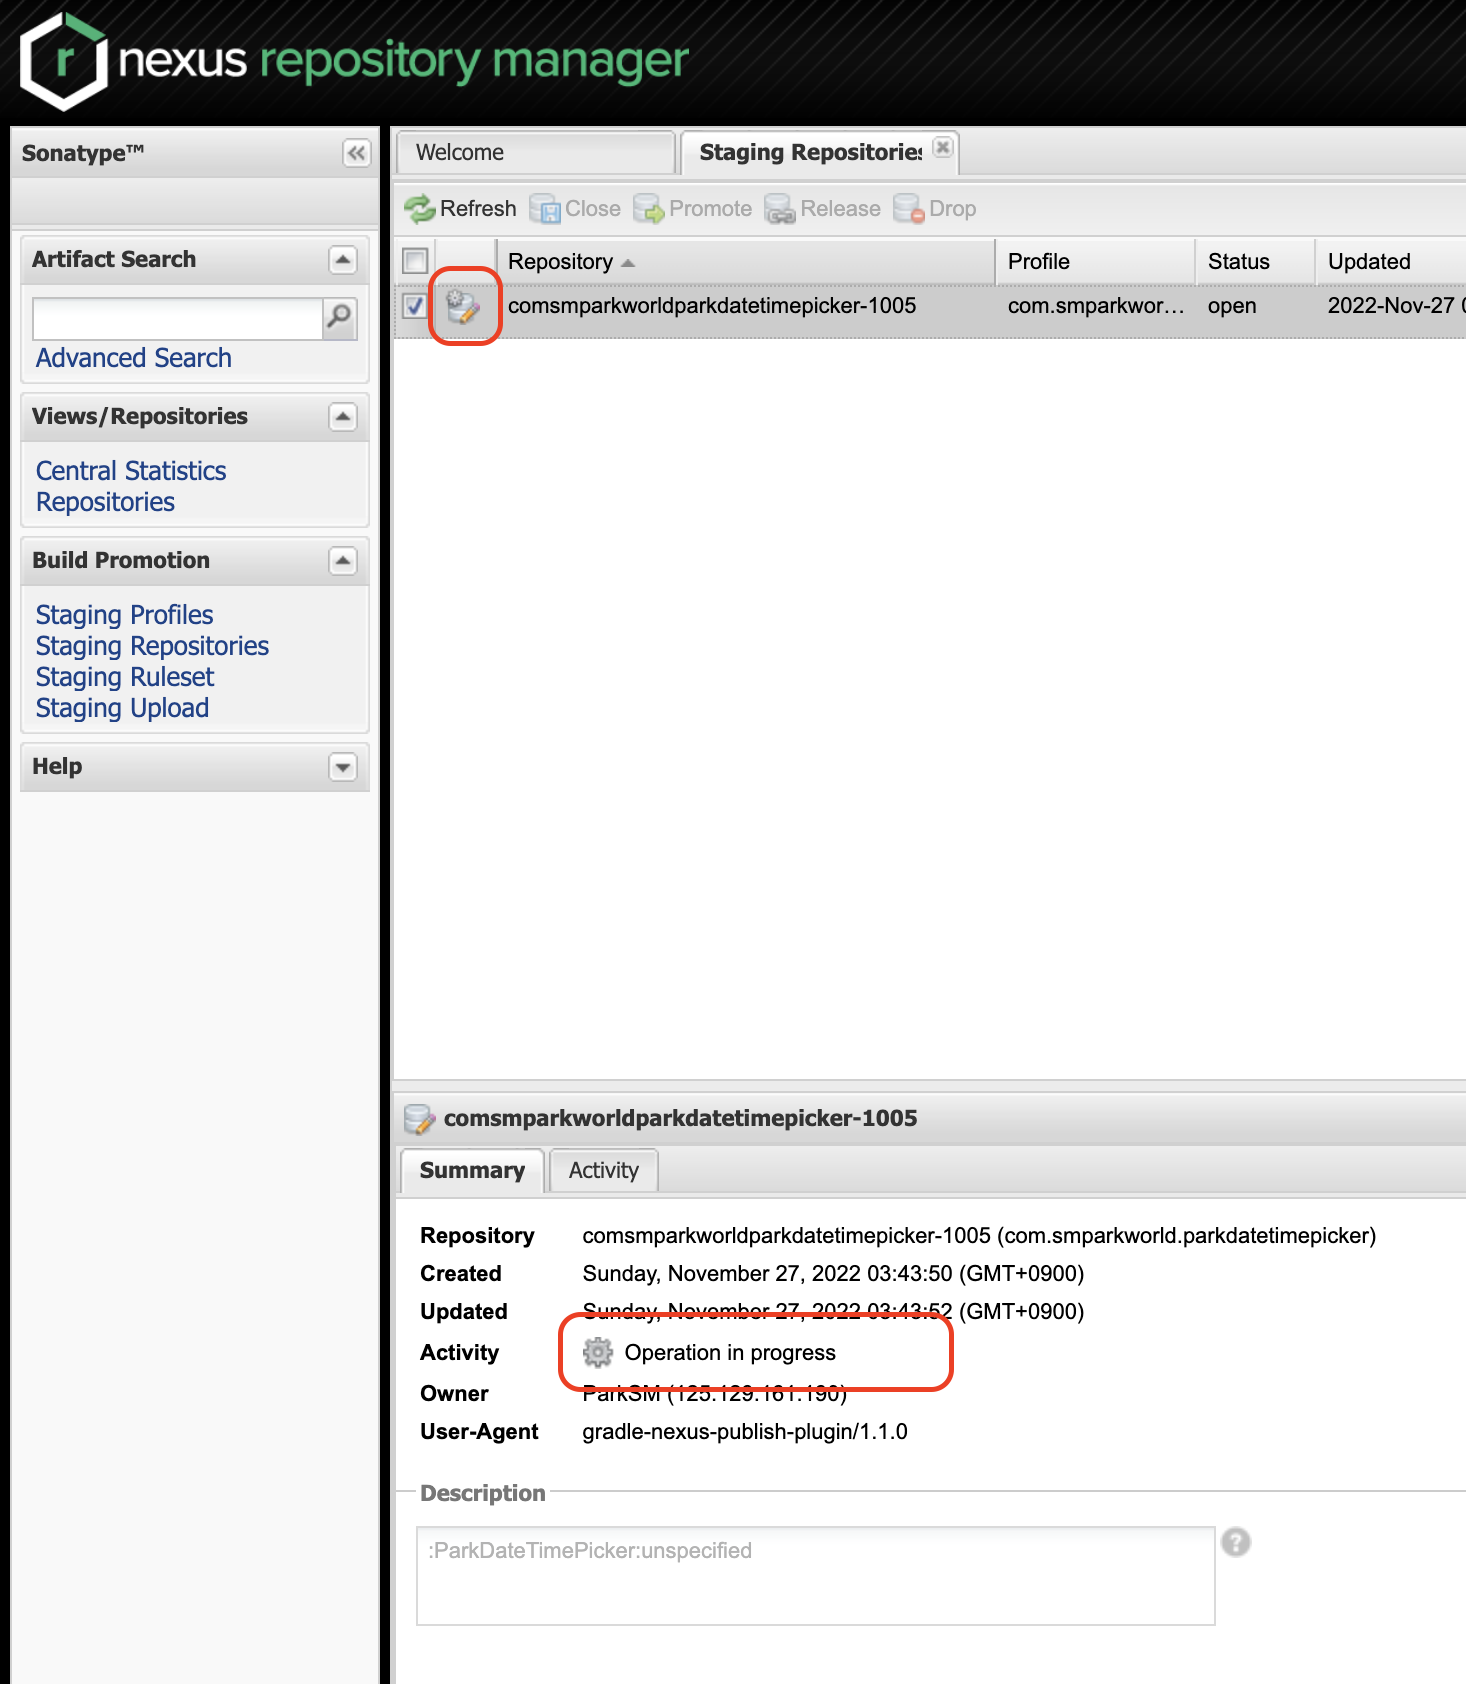
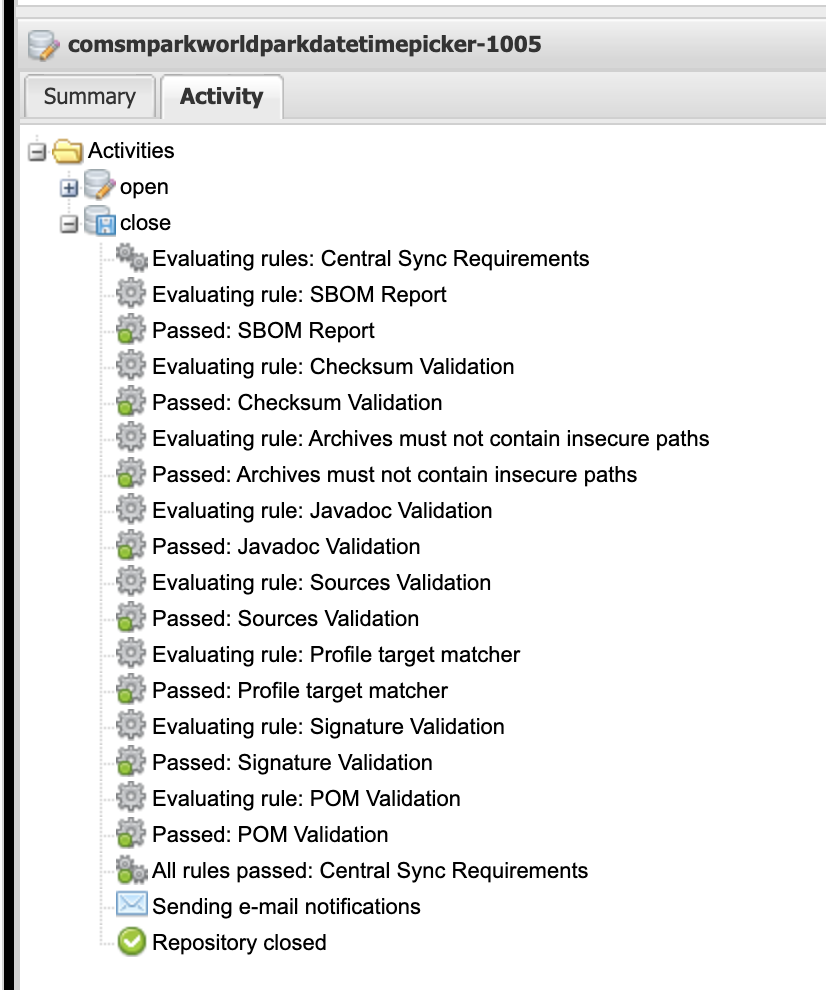
5. 조금 기다리면서 Refresh를 클릭하다보면 아래의 사진처럼 톱니바퀴 아이콘이 없어지면서 Release 버튼이 활성화가 된다. 이제 아래 사진 속 1~3번을 참고하여 배포 내용 선택, Release 버튼 클릭한다. 그리고 위에 3번 과정에서 입력했던 라이브러리 설명을 한번 더 입력한 후 Confirm을 클릭한다. 여기서 Automatically Drop을 체크하게 되면, Release 배포가 끝나면 알아서 Nexus에 업로드된 변경 사항을 없애준다.
이제 평균 30분 안으로 Maven Central에 반영된다. 필자는 수 분 내로 금방 반영됐다. 필자 경험으로는 이 MavenCentral 레포지토리 웹 페이지에서 확인하는 게 가장 빠르게 확인할 수 있는 방법인 것 같다. 해당 사이트에서 위의 과정 중 #1의 2번에서 입력한 Group Id 디렉토리로 찾아서 들어가면 되고, 배포한 버전 디렉토리가 있으면 잘 반영된 것이다. 그 다음 배포 확인할 수 있는 곳이 MavenCentral Search 웹 페이지인데 여기가 배포 후 며칠 뒤에 반영되는 것 같다.
다음에는 Jenkins CI를 연동해서 해당 배포 과정을 자동화하는 방법에 대해서 정리해볼까 한다. 물론 내용은 간단할 것 같다. 대충 힌트는 위의 과정 중 #3의 7번 과정에서 입력한 것들을 Jenkins의 Credentials로 저장하고 Jenkins Pipeline script에서 위의 과정 중 #4의 1번 과정에 있는 gradlew 명령어를 활용하여 배포하는 것이다.